Menu,不同于Button、TextView之类的控件,它不需要在布局文件中指定位置,它是用于提供给用户额外的操作选择,因此不必局限于某一个固定位置,它可以搭配任何控件。
常见的Menu可以分为三种:
- ToolBar上的选项菜单,这是固定的设计,配合ToolBar实现很简单;
- 上下文菜单ContextMenu,与某一个控件关联,可以实现在点击(长按)的位置出现菜单选项的效果;
- 弹出菜单PopupMenu,动态生成,作为一个点击事件触发,出现的位置与被点击的控件位置绑定(上方或下方),与上下文菜单不同。

1. 菜单选项数据来源
如上图所示,展开的就是菜单Menu,菜单中包含一个一个的MenuItem,前面已经说了Menu不同于Button之类的控件,它的使用也是非常不同,最重要的部分其实是如何定义这些MenuItem,推荐的做法是使用xml资源文件定义MenuItem的文字内容以及Icon等等,然后在activity或fragment中处理点击事件;当然还有动态添加的方式可以使用。
1.1 使用xml定义菜单
这里先不必考虑如何使用Menu,只是定义菜单选项,需要在res/menu/目录下建一个xml文件
<!-- menu_main.xml -->
<menu xmlns:android="http://schemas.android.com/apk/res/android"
    xmlns:app="http://schemas.android.com/apk/res-auto">

    <item
        android:id="@+id/action_add_a_contact"
        android:icon="@drawable/ic_add_black_24dp"
        android:title="Add a Contact"
        app:showAsAction="always" />
    <item
        android:id="@+id/action_create_a_contact_group"
        android:icon="@drawable/ic_create_black_24dp"
        android:title="Create a Contact Group"
        app:showAsAction="never" />

    <item
        android:id="@+id/action_add_a_app"
        android:title="Add a App"
        app:showAsAction="always" />
    <item
        android:id="@+id/submenu"
        android:title="Submenu">

        <menu>
            <item
                android:id="@+id/action_create_a_channel"
                android:icon="@drawable/ic_create_new_folder_black_24dp"
                android:title="Create a Channel"
                app:showAsAction="never" />
            <item
                android:id="@+id/action_join_a_channel"
                android:icon="@drawable/ic_adjust_black_24dp"
                android:title="Join a Channel"
                app:showAsAction="never" />
        </menu>
    </item>

</menu>
上面的布局文件产生的效果如下图所示
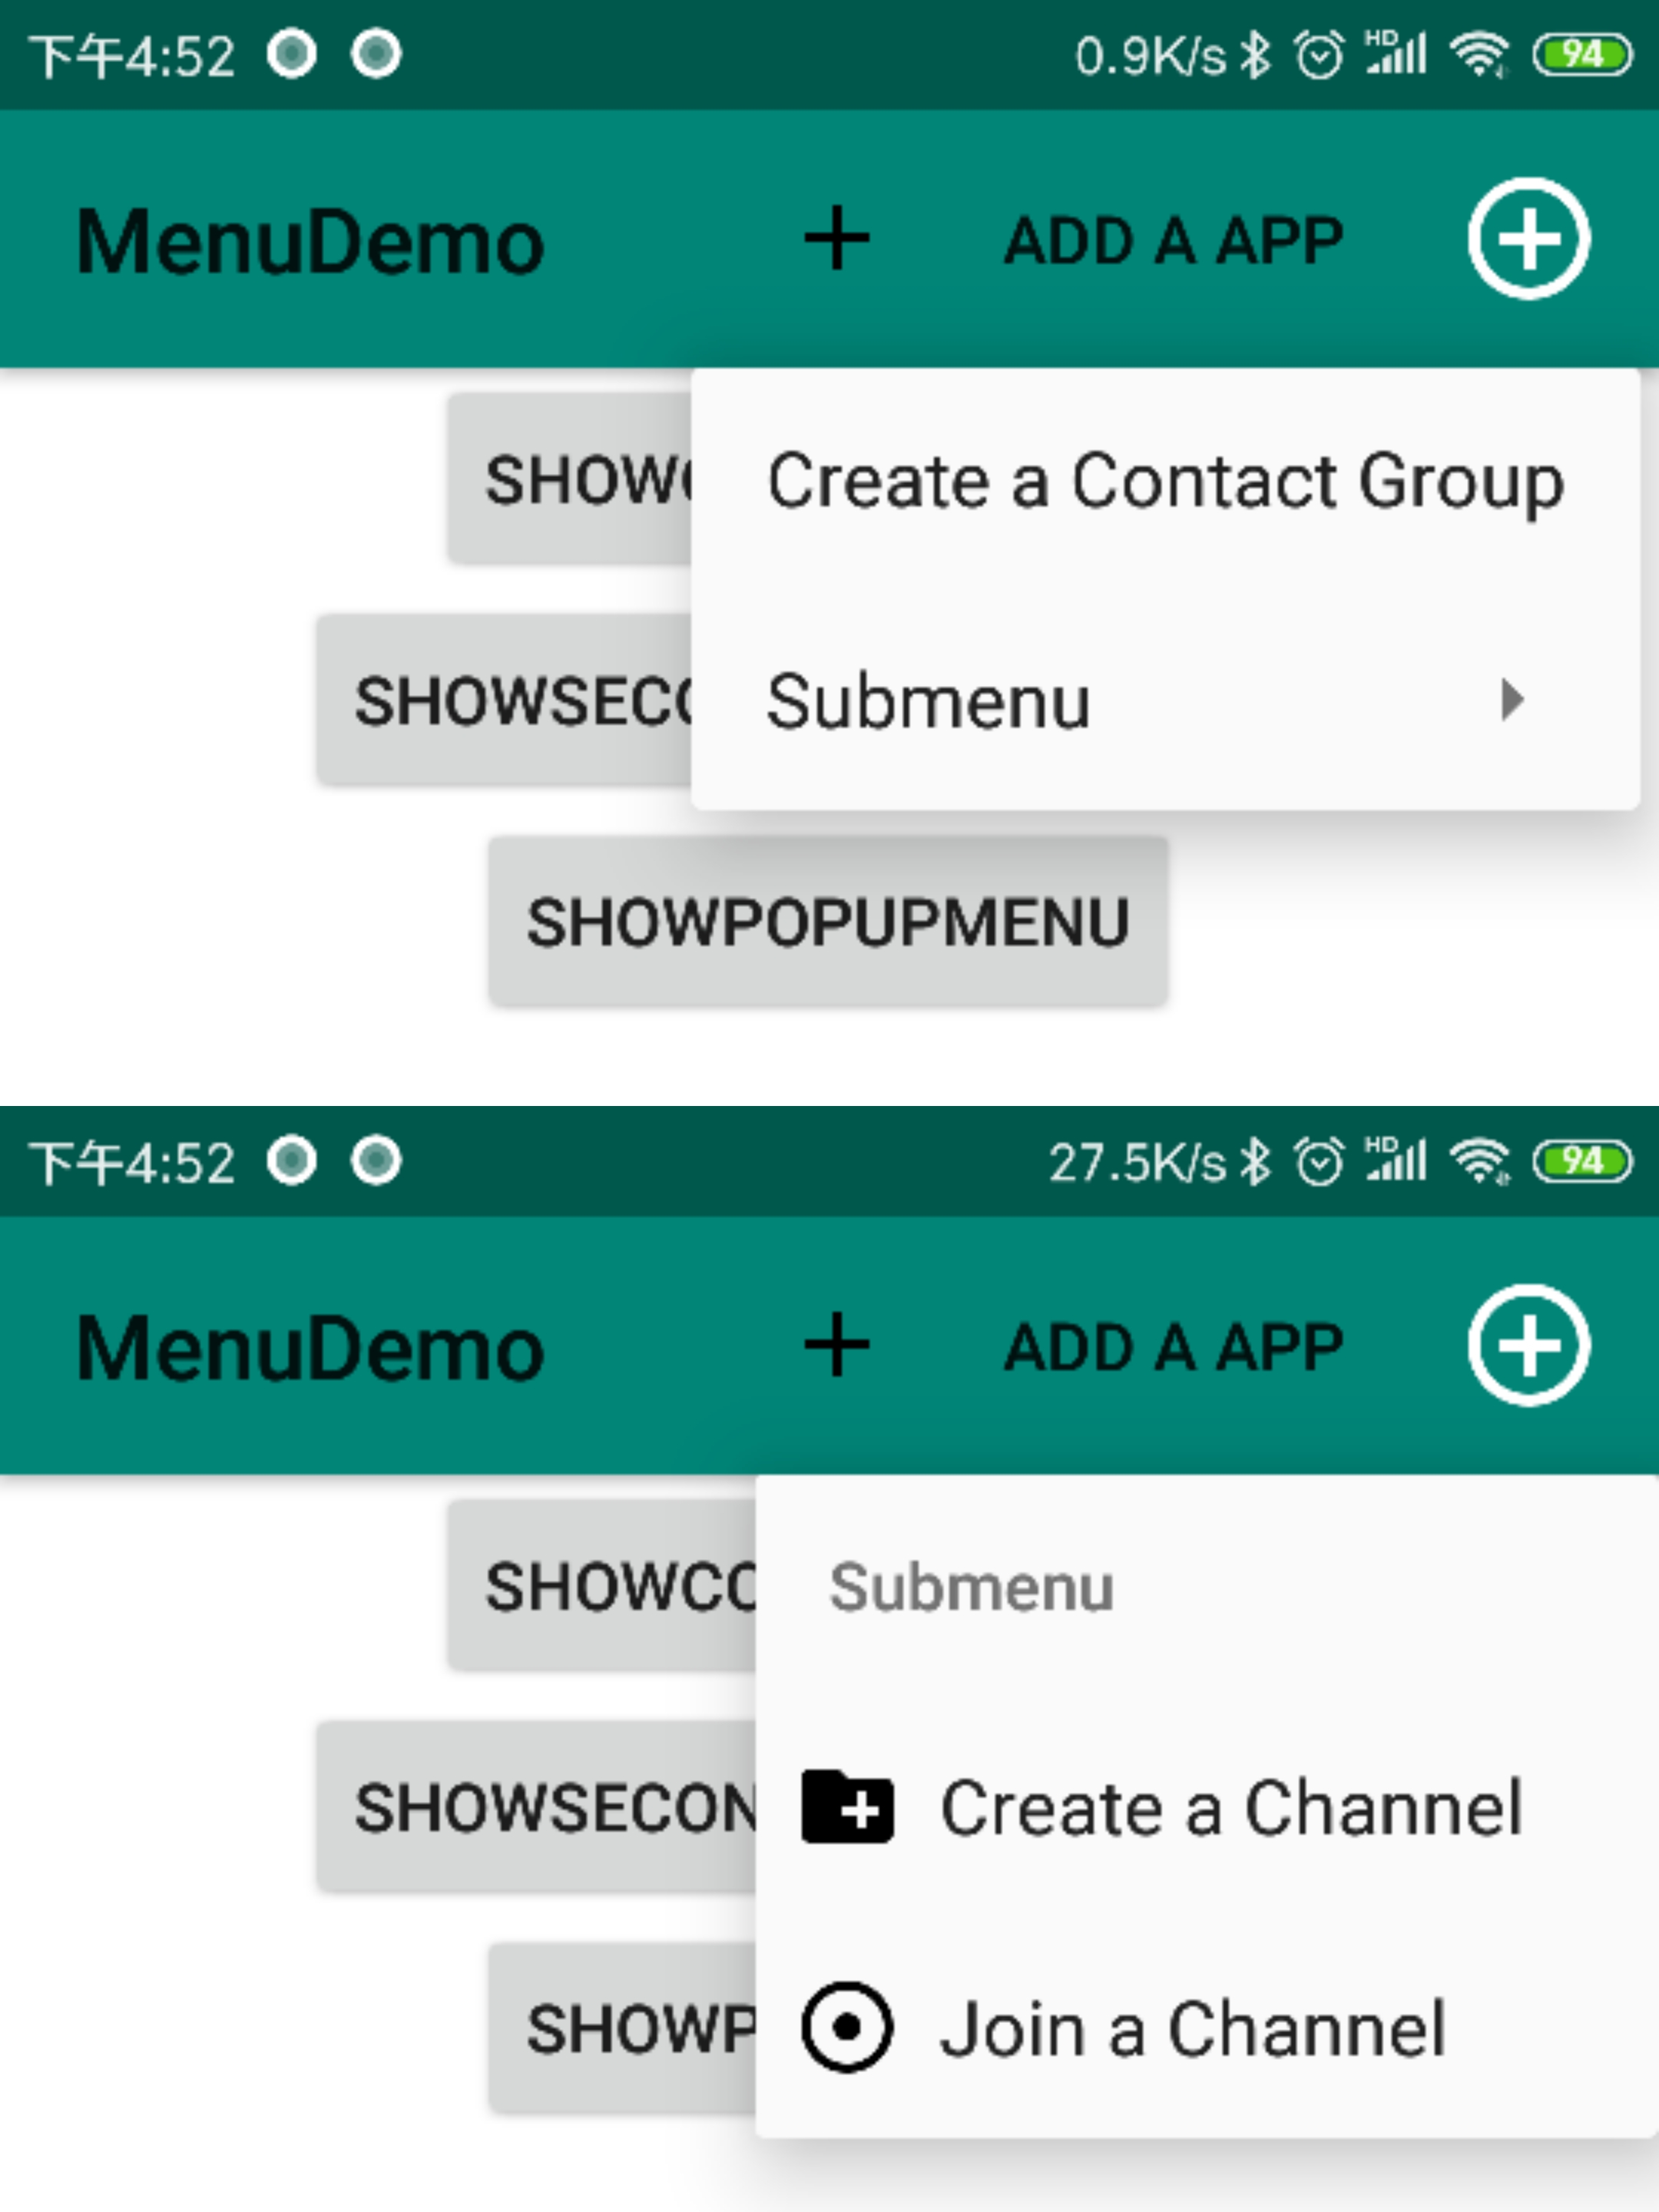
有几个特点:
- 如果Item设置了Icon,那么如果出现在ToolBar上就是Icon,如果没有设置Icon,则显示大写文字;
- Icon在折叠的Menu中不显示,但是在二级菜单中可以显示;
- Item的顺序会被showAsAction参数影响。
1.2 在Activity中使用Menu
只需要在activity中重写onCreateOptionsMenu()方法即可,将上面定义的xml资源文件加载,前提是有ToolBar
    @Override
    public boolean onCreateOptionsMenu(Menu menu) {
        super.onCreateOptionsMenu(menu);
        getMenuInflater().inflate(R.menu.menu_main, menu);
        return true;
    }
点击事件处理,只需要在activity中重写onOptionsItemSelected()方法即可
    @Override
    public boolean onOptionsItemSelected(MenuItem item) {
        switch (item.getItemId()) {
            case R.id.action_add_a_contact:
                Toast.makeText(this, "action_add_a_contact", Toast.LENGTH_SHORT).show();
                return true;
            case R.id.action_create_a_channel:
                Toast.makeText(this, "action_create_a_channel", Toast.LENGTH_SHORT).show();
                return true;
            case R.id.action_create_a_contact_group:
                Toast.makeText(this, "action_create_a_contact_group", Toast.LENGTH_SHORT).show();
                return true;
            case R.id.action_add_a_app:
                Toast.makeText(this, "action_add_a_app", Toast.LENGTH_SHORT).show();
                return true;
            case R.id.action_join_a_channel:
                Toast.makeText(this, "action_join_a_channel", Toast.LENGTH_SHORT).show();
                return true;
            default:
                return super.onOptionsItemSelected(item);
        }
    }
如果需要在运行时修改MenuItem的状态,可以重写onPrepareOptionsMenu()方法(每点击一次都会执行一次),比如可以在这里进行状态判断以禁用某些选项
    // 首先需要一个flag控制
    private Boolean flag = false;

    // 其次在需要动态修改Menu状态的位置修改flag值,然后调用invalidateOptionsMenu(),
    // 这个方法会调用onPrepareOptionsMenu()方法,从而实现Menu的状态变化
    button.setOnClickListener(v -> {
        flag = true;
        invalidateOptionsMenu();  //  Android 3.0 及更高版本中必须调用invalidateOptionsMenu
    });

    @Override
    public boolean onPrepareOptionsMenu(Menu menu) {
        if (flag) {
            menu.findItem(R.id.action_create_a_contact_group).setVisible(false);
            menu.findItem(R.id.action_join_a_channel).setVisible(false);
        }
        return super.onPrepareOptionsMenu(menu);
    }
1.3 修改默认的ToolBar Menu图标以及点击背景色
默认为三个点,可以在styles.xml中进行修改
比如ToolBar在布局文件中如下
    <androidx.appcompat.widget.Toolbar
        android:id="@+id/my_toolbar"
        android:layout_width="match_parent"
        android:layout_height="?attr/actionBarSize"
        android:elevation="4dp"
        android:theme="@style/ToolbarBase"
        app:popupTheme="@style/OverflowMenu">

    </androidx.appcompat.widget.Toolbar>
两个参数
- theme:为整个ToolBar的主题,actionOverflowButtonStyle可以修改默认图标
- popupTheme:为弹出的Menu的主题,colorControlHighlight可以修改点击背景色
    <style name="ToolbarBase" parent="ThemeOverlay.AppCompat.ActionBar">
        <item name="actionOverflowButtonStyle">@style/OverflowButtonStyle</item>
        <!--<item name="actionOverflowMenuStyle">@style/OverflowMenu</item>-->
    </style>

    <style name="OverflowButtonStyle" parent="@android:style/Widget.ActionButton.Overflow">
        <item name="android:src">@drawable/ic_add_circle_outline_black_24dp</item>
        <item name="overlapAnchor">false</item>
    </style>

    <style name="OverflowMenu" parent="ThemeOverlay.AppCompat.Light">
        <!--遮挡属性-->
        <item name="overlapAnchor">false</item>
        <!--MenuItem选中背景颜色-->
        <item name="colorControlHighlight">@color/holo_blue_light</item>
    </style>
2. 上下文菜单
ContextMenu可以用在非常多的控件上,这里仅简单使用Button和RecyclerView,通常来说,触发ContextMenu的方式是长按,因此与该控件的OnLongClick事件冲突, 如果在onLongClick()方法中返回true,则代表点击事件被消耗,不再继续传递,那么ContextMenu不会触发;反之返回false,则ContextMenu被触发。由此可知,onLongClick()的优先级在ContextMenu之上,具体会在Android事件传递中分析。
ContextMenu可以在一个Activity中有多个,甚至可以在RecyclerView中使用,但是仅需要重写两个方法即可判断ContextMenu的来源。
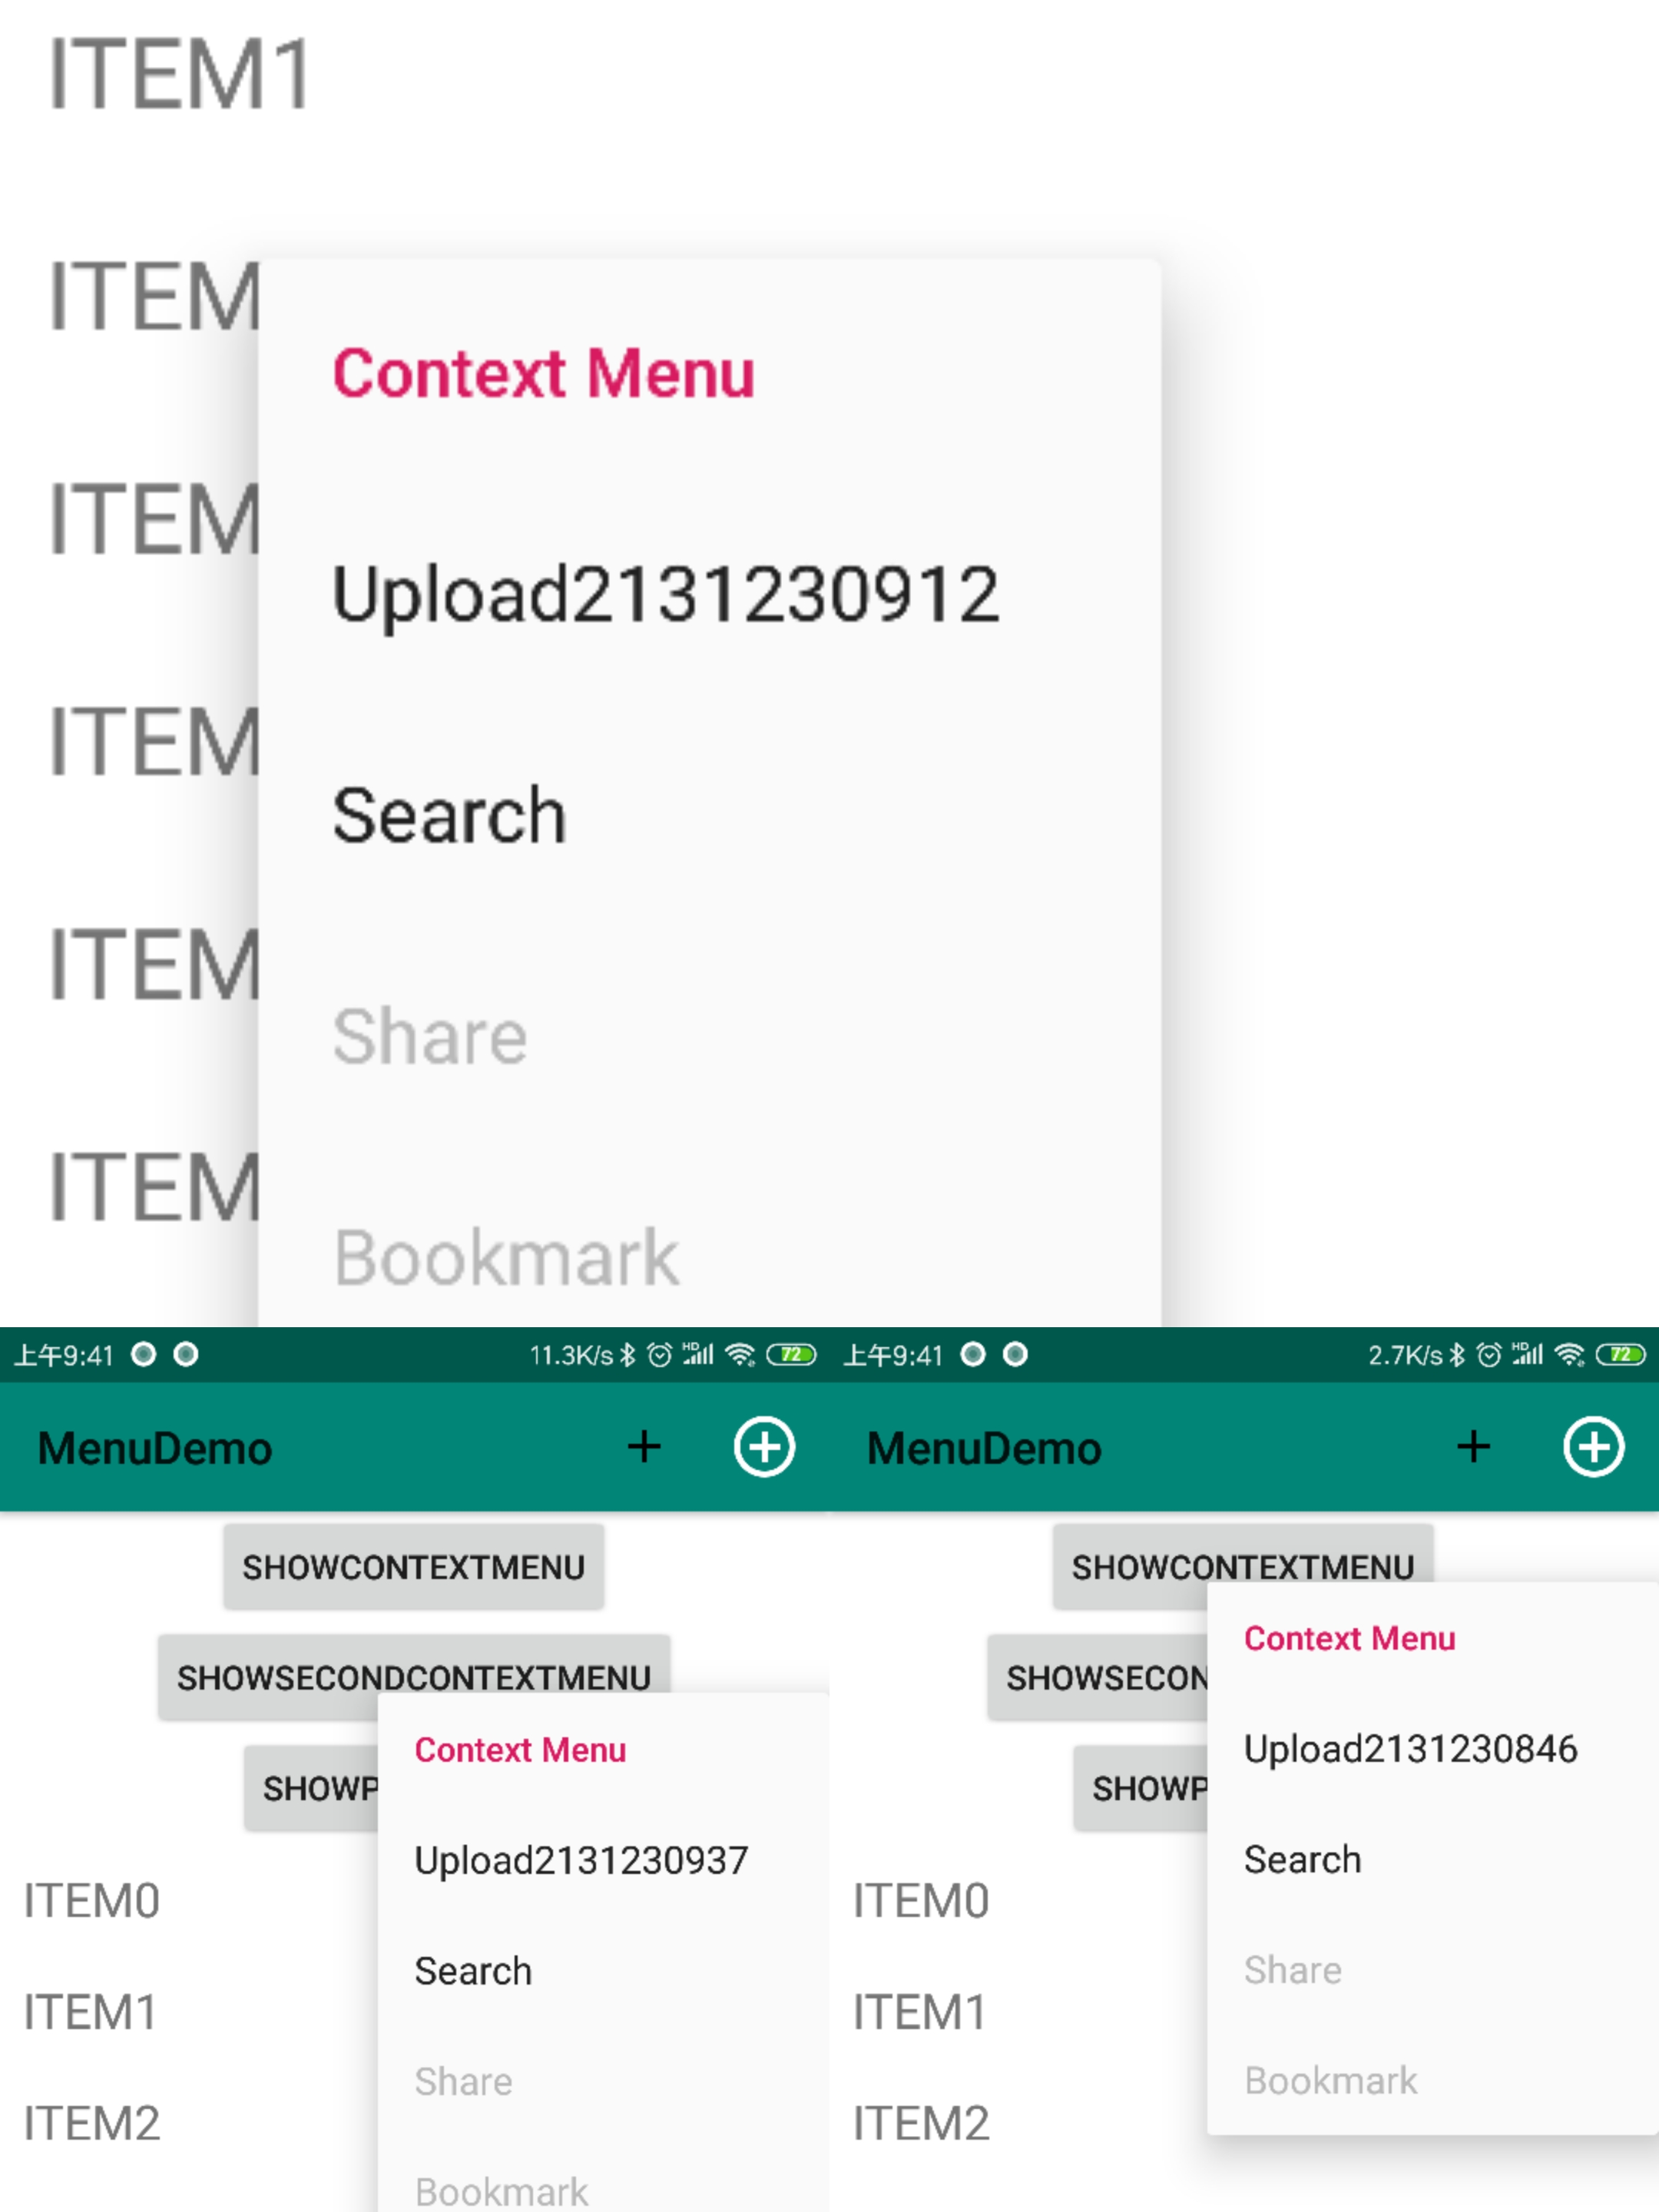
如上图所示,Upload后面跟的是该控件的ItemId,三个Menu各不相同,所以显然我们可以根据控件的不同生成不同的ContextMenu,点击事件同理。
使用ContextMenu的三个步骤:
1.注册,更确切的说法是关联,即指定需要生成ContextMenu的控件,一句话解决
        registerForContextMenu(recyclerView); // 对RecyclerView也是一样,但是这里我用的是自定义RecyclerView,稍后解释
        registerForContextMenu(button); // 直接在onCreate中注册即可,有几个控件就注册几次
        registerForContextMenu(button1);
2.重写onCreateContextMenu方法,生成Menu
    @Override
    public void onCreateContextMenu(ContextMenu menu, View v, ContextMenu.ContextMenuInfo menuInfo) {
        super.onCreateContextMenu(menu, v, menuInfo);
        // 这里实现了根据Id不同生成不同的Menu
        switch (v.getId()) {
            case R.id.first_button:
                addMenu(menu, v);
                break;
            case R.id.second_button:
                addMenu(menu, v);
                break;
            case R.id.recycler_view:
                addMenu(menu, v);
            default:
                break;
        }
    }

    private void addMenu(ContextMenu menu, View v) {
        menu.setHeaderTitle("Context Menu");
        menu.add(0, v.getId(), 0, "Upload" + v.getId());
        menu.add(0, v.getId(), 0, "Search");
        menu.add(1, v.getId(), 0, "Share");
        menu.add(1, v.getId(), 0, "Bookmark");
        // 同时可以通过groupId来禁用某些选项,这是额外的功能
        menu.setGroupEnabled(1, false);
    }
3.重写onContextItemSelected方法,点击事件响应
    @Override
    public boolean onContextItemSelected(MenuItem item) {
        // 这里需要注意,因为RecyclerView需要传入Item的Position属性,所以需要自定义RecyclerView
        RecyclerViewWithContextMenu.RecyclerViewContextInfo info = (RecyclerViewWithContextMenu.RecyclerViewContextInfo) item.getMenuInfo();
        Log.d(TAG, "onCreateContextMenu position = " + (info != null ? info.getPosition() : "-1"));
        // 通过判断点击的Item是否存在getMenuInfo获得的值,可以判断点击事件的来源,RecyclerView还是Button
        if (info != null && info.getPosition() != -1) {
            Toast.makeText(this, "Selected Item: " + item.getTitle() + " data: " + data.get(info.getPosition()), Toast.LENGTH_SHORT).show();
        } else {
            Toast.makeText(this, "Selected Item: " + item.getTitle(), Toast.LENGTH_SHORT).show();
        }
        return true;
    }
- 自定义的RecyclerViewWithContextMenu
public class RecyclerViewWithContextMenu extends RecyclerView {
    private static final String TAG = RecyclerViewWithContextMenu.class.getSimpleName();

    private RecyclerViewContextInfo mContextInfo = new RecyclerViewContextInfo();

    public RecyclerViewWithContextMenu(@NonNull Context context) {
        super(context);
    }

    public RecyclerViewWithContextMenu(@NonNull Context context, @Nullable AttributeSet attrs) {
        super(context, attrs);
    }

    public RecyclerViewWithContextMenu(@NonNull Context context, @Nullable AttributeSet attrs, int defStyle) {
        super(context, attrs, defStyle);
    }

    // 关键方法,重写showContextMenuForChild,将position属性传出去
    @Override
    public boolean showContextMenuForChild(View originalView) {
        final int longPressPosition = getChildAdapterPosition(originalView);
        if (longPressPosition >= 0) {
            mContextInfo.mPosition = longPressPosition;
            return super.showContextMenuForChild(originalView);
        }
        return false;
    }

    @Override
    protected ContextMenu.ContextMenuInfo getContextMenuInfo() {
        return mContextInfo;
    }

    // 通过自定义的ContextMenuInfo保存position的值,并提供调用的方法
    public static class RecyclerViewContextInfo implements ContextMenu.ContextMenuInfo {
        private int mPosition = -1;

        public int getPosition() {
            return mPosition;
        }
    }
}
3. 弹出菜单
PopupMenu是使用上最简单的,它的效果与ContextMenu类似但不完全相同,主要是位置是相对固定的,但是PopupMenu可以动态调用,与整体的布局无关
public class MainActivity extends AppCompatActivity implements PopupMenu.OnMenuItemClickListener {

    private static final String TAG = MainActivity.class.getSimpleName();

    // ...

    @Override
    protected void onCreate(Bundle savedInstanceState) {
        super.onCreate(savedInstanceState);
        setContentView(R.layout.activity_main);
        // ...
        // PopupMenu通过onClick事件创建
        findViewById(R.id.pop_button).setOnClickListener(new View.OnClickListener() {
            @Override
            public void onClick(View v) {
                showPopupMenu(v);
            }
        });
        // ...
    }

    // ...

    public void showPopupMenu(View v) {
        // new一个对象,同样可以使用xml加载选项
        PopupMenu popup = new PopupMenu(this, v);
        popup.inflate(R.menu.menu_main);
        popup.show();
        // 这里需要继承PopupMenu.OnMenuItemClickListener接口
        popup.setOnMenuItemClickListener(this);
    }

    @Override
    public boolean onMenuItemClick(MenuItem item) {
        // 点击事件响应
        switch (item.getItemId()) {
            case R.id.action_add_a_contact:
                Toast.makeText(this, "action_add_a_contact", Toast.LENGTH_SHORT).show();
                return true;
            case R.id.action_create_a_channel:
                Toast.makeText(this, "action_create_a_channel", Toast.LENGTH_SHORT).show();
                return true;
            case R.id.action_create_a_contact_group:
                Toast.makeText(this, "action_create_a_contact_group", Toast.LENGTH_SHORT).show();
                return true;
            case R.id.action_add_a_app:
                Toast.makeText(this, "action_add_a_app", Toast.LENGTH_SHORT).show();
                return true;
            case R.id.action_join_a_channel:
                Toast.makeText(this, "action_join_a_channel", Toast.LENGTH_SHORT).show();
                return true;
            default:
                return super.onOptionsItemSelected(item);
        }
    }
}
4. Android事件分发机制
之所以会想到Android事件分发机制,主要是在ContextMenu的使用上发现长按事件的处理以及冲突,从而对长按事件优先级有一点思考,结合一些参考的文章,写一下自己的理解。
在使用ContextMenu中会产生以下几个问题,根据这些问题,可以尝试在源码里找结果。
- 为什么ContextMenu只需要注册就可以使用,而不是new一个对象出来,类似于PopupMenu?
首先看与ContextMenu相关的几个方法:
registerForContextMenu
onCreateContextMenu
onContextItemSelected
// Activity.java registerForContextMenu这个方法仅仅是对view进行了注册listener

    /**
     * Registers a context menu to be shown for the given view (multiple views
     * can show the context menu). This method will set the
     * {@link OnCreateContextMenuListener} on the view to this activity, so
     * {@link #onCreateContextMenu(ContextMenu, View, ContextMenuInfo)} will be
     * called when it is time to show the context menu.
     *
     * @see #unregisterForContextMenu(View)
     * @param view The view that should show a context menu.
     */
    public void registerForContextMenu(View view) {
        view.setOnCreateContextMenuListener(this);
    }

// --------------------------------------------------------------------------------

// View.java 注册的过程中通过setLongClickable强制让此控件可以被long click,同时传递listener

    /**
     * Register a callback to be invoked when the context menu for this view is
     * being built. If this view is not long clickable, it becomes long clickable.
     *
     * @param l The callback that will run
     *
     */
    public void setOnCreateContextMenuListener(OnCreateContextMenuListener l) {
        if (!isLongClickable()) {
            setLongClickable(true);
        }
        getListenerInfo().mOnCreateContextMenuListener = l;
    }

    /**
        * Listener used to build the context menu.
        * This field should be made private, so it is hidden from the SDK.
        * {@hide}
        */
    protected OnCreateContextMenuListener mOnCreateContextMenuListener;

    // 这个listener的作用就是通过li.mOnCreateContextMenuListener.onCreateContextMenu(menu, this, menuInfo)
    // 将menu和menuInfo传出去,也就是说,我们在调用super.onCreateContextMenu(menu, v, menuInfo)后即可得到menu的实例,
    // 然后对menu实例进行处理,比如menu.add增加选项、menu.setGroupEnabled设置可点击的选项等等,
    // 此处暂不讨论createContextMenu是在哪里调用的,因为涉及到PhoneWindow和DecorView。

    /**
     * Show the context menu for this view. It is not safe to hold on to the
     * menu after returning from this method.
     *
     * You should normally not overload this method. Overload
     * {@link #onCreateContextMenu(ContextMenu)} or define an
     * {@link OnCreateContextMenuListener} to add items to the context menu.
     *
     * @param menu The context menu to populate
     */
    public void createContextMenu(ContextMenu menu) {
        ContextMenuInfo menuInfo = getContextMenuInfo();

        // Sets the current menu info so all items added to menu will have
        // my extra info set.
        ((MenuBuilder)menu).setCurrentMenuInfo(menuInfo);

        onCreateContextMenu(menu);
        ListenerInfo li = mListenerInfo;
        if (li != null && li.mOnCreateContextMenuListener != null) {
            li.mOnCreateContextMenuListener.onCreateContextMenu(menu, this, menuInfo);
        }

        // Clear the extra information so subsequent items that aren't mine don't
        // have my extra info.
        ((MenuBuilder)menu).setCurrentMenuInfo(null);

        if (mParent != null) {
            mParent.createContextMenu(menu);
        }
    }

// --------------------------------------------------------------------------------

// Activity.java Item点击事件响应,除了ContextMenu,可以发现普通的ToolBar上的Menu的点击(onOptionsItemSelected)
// 也是在这里响应的。

    /**
     * Default implementation of
     * {@link android.view.Window.Callback#onMenuItemSelected}
     * for activities.  This calls through to the new
     * {@link #onOptionsItemSelected} method for the
     * {@link android.view.Window#FEATURE_OPTIONS_PANEL}
     * panel, so that subclasses of
     * Activity don't need to deal with feature codes.
     */
    public boolean onMenuItemSelected(int featureId, MenuItem item) {
        CharSequence titleCondensed = item.getTitleCondensed();
        // 通过featureId参数判断是来自ToolBar的Menu还是ContextMenu,显然这个参数来自于onMenuItemSelected方法被调用的地方
        // 可以在ToolbarWidgetWrapper.java和PhoneWindow.java中找到
        switch (featureId) {
            case Window.FEATURE_OPTIONS_PANEL:
                // Put event logging here so it gets called even if subclass
                // doesn't call through to superclass's implmeentation of each
                // of these methods below
                if(titleCondensed != null) {
                    EventLog.writeEvent(50000, 0, titleCondensed.toString());
                }
                // 在这里可以看到如果onOptionsItemSelected返回false,点击事件会继续传递下去,所以我们在重写onOptionsItemSelected
                // 方法时会在执行对应选项的点击事件后返回true以消耗点击事件
                if (onOptionsItemSelected(item)) {
                    return true;
                }
                if (mFragments.dispatchOptionsItemSelected(item)) {
                    return true;
                }
                if (item.getItemId() == android.R.id.home && mActionBar != null &&
                        (mActionBar.getDisplayOptions() & ActionBar.DISPLAY_HOME_AS_UP) != 0) {
                    if (mParent == null) {
                        return onNavigateUp();
                    } else {
                        return mParent.onNavigateUpFromChild(this);
                    }
                }
                return false;

            case Window.FEATURE_CONTEXT_MENU:
                if(titleCondensed != null) {
                    EventLog.writeEvent(50000, 1, titleCondensed.toString());
                }
                // 同上
                if (onContextItemSelected(item)) {
                    return true;
                }
                return mFragments.dispatchContextItemSelected(item);

            default:
                return false;
        }
    }
综上所述,ContextMenu其实是一个比较深层次的控件,它的创建过程被更复杂的PhoneWindow以及DecorView等控制,对开发者来说,Menu是一个直接使用就行的控件,底层不希望开发者对Menu进行指定布局选项之外的操作,因此我们不需要new一个对象出来。至于它是如何在PhoneWindow以及DecorView中创建的,我可能在接下来的博客中写一下自己的理解。
- ContextMenu的触发与该控件的onLongClick方法的冲突是如何产生的?
在上面ContextMenu的使用过程中,会发现ContextMenu默认是长按触发,而且源码里也说明了,控件会被强制赋予长按属性,那么如果同时设置该控件的onLongClick方法会产生怎样的效果,代码很简单,这里有一个疑问了,为什么要返回true?如果返回false会怎样?为什么onClick方法不用返回值?
       button.setOnLongClickListener(new View.OnLongClickListener() {
           @Override
           public boolean onLongClick(View v) {
               Toast.makeText(MainActivity.this, "button long click", Toast.LENGTH_SHORT).show();
               return true;
           }
       });
结果也是很明显的,测试一下就知道这里返回true,那么button的ContextMenu无法触发,Toast会正常产生;返回false,那么button的Toast会产生,而且ContextMenu也会产生,onLongClick方法在onCreateContextMenu方法之前执行。
由此产生了另一个问题,onLongClick方法是如何产生的,解决了这个问题,那么所有的问题都将迎刃而解。
// View.java 最直接的调用onLongClick方法的位置

    /**
     * Calls this view's OnLongClickListener, if it is defined. Invokes the
     * context menu if the OnLongClickListener did not consume the event,
     * optionally anchoring it to an (x,y) coordinate.
     *
     * @param x x coordinate of the anchoring touch event, or {@link Float#NaN}
     *          to disable anchoring
     * @param y y coordinate of the anchoring touch event, or {@link Float#NaN}
     *          to disable anchoring
     * @return {@code true} if one of the above receivers consumed the event,
     *         {@code false} otherwise
     */
    private boolean performLongClickInternal(float x, float y) {
        sendAccessibilityEvent(AccessibilityEvent.TYPE_VIEW_LONG_CLICKED);

        boolean handled = false;
        final ListenerInfo li = mListenerInfo;
        if (li != null && li.mOnLongClickListener != null) {
            // listener调用onLongClick方法的位置,返回值为handled
            handled = li.mOnLongClickListener.onLongClick(View.this);
        }
        // 如果handled为true,则不会执行下面整个方法showContextMenu,看名字也知道这是ContextMenu显示的方法了,
        // 所以如果onLongClick返回true,则不会显示ContextMenu;反之同理。所以上面关于执行先后顺序的疑问解决了
        if (!handled) {
            final boolean isAnchored = !Float.isNaN(x) && !Float.isNaN(y);
            handled = isAnchored ? showContextMenu(x, y) : showContextMenu();
        }
        if ((mViewFlags & TOOLTIP) == TOOLTIP) {
            // 如果handled为true,则不会执行下面整个方法showLongClickTooltip,这个Tooltip是另一个控件,
            // 其触发也是与长按事件相关,暂且不表
            if (!handled) {
                handled = showLongClickTooltip((int) x, (int) y);
            }
        }
        if (handled) {
            performHapticFeedback(HapticFeedbackConstants.LONG_PRESS);
        }
        // 最后还是返回handled的值
        return handled;
    }

    // 再看看onClick方法的调用,很明显单击事件没有其他控件与其冲突,所以它的返回值为空
    /**
     * Call this view's OnClickListener, if it is defined.  Performs all normal
     * actions associated with clicking: reporting accessibility event, playing
     * a sound, etc.
     *
     * @return True there was an assigned OnClickListener that was called, false
     *         otherwise is returned.
     */
    // NOTE: other methods on View should not call this method directly, but performClickInternal()
    // instead, to guarantee that the autofill manager is notified when necessary (as subclasses
    // could extend this method without calling super.performClick()).
    public boolean performClick() {
        // We still need to call this method to handle the cases where performClick() was called
        // externally, instead of through performClickInternal()
        notifyAutofillManagerOnClick();

        final boolean result;
        final ListenerInfo li = mListenerInfo;
        if (li != null && li.mOnClickListener != null) {
            playSoundEffect(SoundEffectConstants.CLICK);
            // 无返回值,没有冲突,result直接设置为true即可
            li.mOnClickListener.onClick(this);
            result = true;
        } else {
            result = false;
        }

        sendAccessibilityEvent(AccessibilityEvent.TYPE_VIEW_CLICKED);

        notifyEnterOrExitForAutoFillIfNeeded(true);

        return result;
    }


    // 然后就是点击事件与长按事件是如何产生的,这里牵涉到onTouchEvent方法,这里把无关代码略过,仅保留重要代码
    /**
     * Implement this method to handle touch screen motion events.
     * <p>
     * If this method is used to detect click actions, it is recommended that
     * the actions be performed by implementing and calling
     * {@link #performClick()}. This will ensure consistent system behavior,
     * including:
     * <ul>
     * <li>obeying click sound preferences
     * <li>dispatching OnClickListener calls
     * <li>handling {@link AccessibilityNodeInfo#ACTION_CLICK ACTION_CLICK} when
     * accessibility features are enabled
     * </ul>
     *
     * @param event The motion event.
     * @return True if the event was handled, false otherwise.
     */
    public boolean onTouchEvent(MotionEvent event) {

        // ...

        if (clickable || (viewFlags & TOOLTIP) == TOOLTIP) {
            switch (action) {
                // MotionEvent分为四种ACTION_UP、ACTION_DOWN、ACTION_CANCEL、ACTION_MOVE
                // 分别对应手指在屏幕的状态:抬起、按下、(例外,暂且不解释)、滑动
                // 通过对这些MotionEvent的监听可以实现各种点击效果,比如多连击、定时点击等等效果,
                // 也可以控制事件的冲突,我们仅需要在自定义控件中重写onTouchEvent方法即可。
                case MotionEvent.ACTION_UP:
                    // ...
                    // 为什么要在抬起的时候触发点击事件performClick,因为长按与点击是有冲突的,
                    // 长按会在ACTION_DOWN里触发,这是由时间控制的,因此ACTION_UP中与长按事件其实关系就不大了
                    // 所以在这里处理点击事件是一个较为合理的设计
                    if ((mPrivateFlags & PFLAG_PRESSED) != 0 || prepressed) {
                        // take focus if we don't have it already and we should in
                        // touch mode.
                        boolean focusTaken = false;
                        if (isFocusable() && isFocusableInTouchMode() && !isFocused()) {
                            focusTaken = requestFocus();
                        }

                        if (prepressed) {
                            // The button is being released before we actually
                            // showed it as pressed.  Make it show the pressed
                            // state now (before scheduling the click) to ensure
                            // the user sees it.
                            setPressed(true, x, y);
                        }

                        if (!mHasPerformedLongPress && !mIgnoreNextUpEvent) {
                            // This is a tap, so remove the longpress check
                            removeLongPressCallback();

                            // Only perform take click actions if we were in the pressed state
                            if (!focusTaken) {
                                // Use a Runnable and post this rather than calling
                                // performClick directly. This lets other visual state
                                // of the view update before click actions start.
                                if (mPerformClick == null) {
                                    // 点击事件的关键,这里的PerformClick是一个Runnable,为什么要用Runnable,之后再解释
                                    mPerformClick = new PerformClick();
                                }
                                // 通过handler调用performClick方法,点击事件就完成了
                                if (!post(mPerformClick)) {
                                    performClickInternal();
                                }
                            }
                        }
                        // ...
                    }
                    mIgnoreNextUpEvent = false;
                    break;

                case MotionEvent.ACTION_DOWN:
                    if (event.getSource() == InputDevice.SOURCE_TOUCHSCREEN) {
                        mPrivateFlags3 |= PFLAG3_FINGER_DOWN;
                    }
                    // mHasPerformedLongPress用于解决长按与点击的事件冲突,具体可以看源码
                    mHasPerformedLongPress = false;

                    // clickable表示该控件是否可以点击(包括点击、长按等)
                    if (!clickable) {
                        // 如果控件不可点击,那么会判断是否需要显示Tooltip或者什么都不干,然后break,
                        // 具体可以看checkForLongClick方法
                        checkForLongClick(0, x, y);
                        break;
                    }

                    // performButtonActionOnTouchDown与外设有关,暂时不用考虑
                    if (performButtonActionOnTouchDown(event)) {
                        break;
                    }

                    // Walk up the hierarchy to determine if we're inside a scrolling container.
                    boolean isInScrollingContainer = isInScrollingContainer();

                    // For views inside a scrolling container, delay the pressed feedback for
                    // a short period in case this is a scroll.
                    // 该控件在一个可以滑动的container内,则会增加一个反应延时,但是最终都是调用checkForLongClick
                    if (isInScrollingContainer) {
                        mPrivateFlags |= PFLAG_PREPRESSED;
                        if (mPendingCheckForTap == null) {
                            mPendingCheckForTap = new CheckForTap();
                        }
                        mPendingCheckForTap.x = event.getX();
                        mPendingCheckForTap.y = event.getY();
                        postDelayed(mPendingCheckForTap, ViewConfiguration.getTapTimeout());
                    } else {
                        // Not inside a scrolling container, so show the feedback right away
                        setPressed(true, x, y);
                        // checkForLongClick也是一个Runnable,最终调用还是performLongClickInternal
                        checkForLongClick(0, x, y);
                    }
                    break;

                // ACTION_CANCEL状态比较难触发,举个例子,在MIUI中开启“传送门”功能,就可以触发
                case MotionEvent.ACTION_CANCEL:
                    if (clickable) {
                        setPressed(false);
                    }
                    removeTapCallback();
                    removeLongPressCallback();
                    mInContextButtonPress = false;
                    mHasPerformedLongPress = false;
                    mIgnoreNextUpEvent = false;
                    mPrivateFlags3 &= ~PFLAG3_FINGER_DOWN;
                    break;

                // ACTION_MOVE状态下removeTapCallback方法和removeLongPressCallback可以取消点击事件,
                // 这也就是为什么我们在按住某个按钮然后滑动出去就可以避免触发点击事件
                case MotionEvent.ACTION_MOVE:
                    if (clickable) {
                        drawableHotspotChanged(x, y);
                    }

                    // Be lenient about moving outside of buttons
                    if (!pointInView(x, y, mTouchSlop)) {
                        // Outside button
                        // Remove any future long press/tap checks
                        removeTapCallback();
                        removeLongPressCallback();
                        if ((mPrivateFlags & PFLAG_PRESSED) != 0) {
                            setPressed(false);
                        }
                        mPrivateFlags3 &= ~PFLAG3_FINGER_DOWN;
                    }
                    break;
            }

            return true;
        }

        return false;
    }
根据上述源码,我们知道了ContextMenu与长按事件冲突的原因,点击事件与长按事件是如何产生的,但是随之而来有了新的问题。
- 为什么要使用Runnable来调用以及如果父容器有点击事件的同时子控件也有点击事件,那么事件传递的过程以及中间冲突是如何解决的?
// View.java 从源码中可以看到,这是一个专门用于UI线程的Handler,通过这个Handler发送的Runnable都会在UI线程中运行
    /**
     * <p>Causes the Runnable to be added to the message queue.
     * The runnable will be run on the user interface thread.</p>
     *
     * @param action The Runnable that will be executed.
     *
     * @return Returns true if the Runnable was successfully placed in to the
     *         message queue.  Returns false on failure, usually because the
     *         looper processing the message queue is exiting.
     *
     * @see #postDelayed
     * @see #removeCallbacks
     */
    public boolean post(Runnable action) {
        final AttachInfo attachInfo = mAttachInfo;
        if (attachInfo != null) {
            return attachInfo.mHandler.post(action);
        }

        // Postpone the runnable until we know on which thread it needs to run.
        // Assume that the runnable will be successfully placed after attach.
        getRunQueue().post(action);
        return true;
    }
结合上面的部分注释,说明一个原理,所有的点击事件以及屏幕绘制都要在UI线程中处理,这是为了方便点击触发时重绘UI
// Use a Runnable and post this rather than calling
// performClick directly. This lets other visual state
// of the view update before click actions start.
从上面的源码部分我们知道了点击或者长按事件是通过onTouchEvent触发的,那么再看看onTouchEvent是在哪里调用的
// View.java onTouchEvent是在dispatchTouchEvent方法中被调用,看注释就知道这个方法它是要将MotionEvent传递给target view
    /**
     * Pass the touch screen motion event down to the target view, or this
     * view if it is the target.
     *
     * @param event The motion event to be dispatched.
     * @return True if the event was handled by the view, false otherwise.
     */
    public boolean dispatchTouchEvent(MotionEvent event) {
        // If the event should be handled by accessibility focus first.
        if (event.isTargetAccessibilityFocus()) {
            // We don't have focus or no virtual descendant has it, do not handle the event.
            if (!isAccessibilityFocusedViewOrHost()) {
                return false;
            }
            // We have focus and got the event, then use normal event dispatch.
            event.setTargetAccessibilityFocus(false);
        }
        // result表示这个MotionEvent是否会被消耗
        boolean result = false;

        if (mInputEventConsistencyVerifier != null) {
            mInputEventConsistencyVerifier.onTouchEvent(event, 0);
        }

        final int actionMasked = event.getActionMasked();
        if (actionMasked == MotionEvent.ACTION_DOWN) {
            // Defensive cleanup for new gesture
            stopNestedScroll();
        }

        if (onFilterTouchEventForSecurity(event)) {
            if ((mViewFlags & ENABLED_MASK) == ENABLED && handleScrollBarDragging(event)) {
                result = true;
            }
            //noinspection SimplifiableIfStatement
            ListenerInfo li = mListenerInfo;
            // 如果调用了onTouch方法,那么当前result被置为true,则后面onTouchEvent不会执行,那么事件在onTouch中处理
            if (li != null && li.mOnTouchListener != null
                    && (mViewFlags & ENABLED_MASK) == ENABLED
                    && li.mOnTouchListener.onTouch(this, event)) {
                result = true;
            }
            // onTouchEvent调用的位置
            if (!result && onTouchEvent(event)) {
                result = true;
            }
        }

        if (!result && mInputEventConsistencyVerifier != null) {
            mInputEventConsistencyVerifier.onUnhandledEvent(event, 0);
        }

        // Clean up after nested scrolls if this is the end of a gesture;
        // also cancel it if we tried an ACTION_DOWN but we didn't want the rest
        // of the gesture.
        if (actionMasked == MotionEvent.ACTION_UP ||
                actionMasked == MotionEvent.ACTION_CANCEL ||
                (actionMasked == MotionEvent.ACTION_DOWN && !result)) {
            stopNestedScroll();
        }

        return result;
    }
再往上看,View的dispatchTouchEvent是在哪里调用的,可以往上追溯到ViewGroup的dispatchTransformedTouchEvent方法
// ViewGroup.java ViewGroup继承自View,但是可以把它当做一个容器,比如LinearLayout就是继承自ViewGroup,
// ViewGroup的dispatchTransformedTouchEvent将MotionEvent传给指定的子view,如果子view为空,那么这个ViewGroup
// 自己就处理MotionEvent,而我们知道ViewGroup继承自View,所以可以调用super.dispatchTouchEvent(event)
    /**
     * Transforms a motion event into the coordinate space of a particular child view,
     * filters out irrelevant pointer ids, and overrides its action if necessary.
     * If child is null, assumes the MotionEvent will be sent to this ViewGroup instead.
     */
    private boolean dispatchTransformedTouchEvent(MotionEvent event, boolean cancel,
            View child, int desiredPointerIdBits) {
        // handled标志事件是否被消耗
        final boolean handled;

        // Canceling motions is a special case.  We don't need to perform any transformations
        // or filtering.  The important part is the action, not the contents.
        final int oldAction = event.getAction();
        // ACTION_CANCEL也要传递出去
        if (cancel || oldAction == MotionEvent.ACTION_CANCEL) {
            event.setAction(MotionEvent.ACTION_CANCEL);
            // 通过判断传入的child值决定在子view中处理事件还是在当前ViewGroup中处理
            if (child == null) {
                handled = super.dispatchTouchEvent(event);
            } else {
                handled = child.dispatchTouchEvent(event);
            }
            event.setAction(oldAction);
            return handled;
        }

        // Calculate the number of pointers to deliver.
        // 这里出现了一个新的概念pointers,这是由于许多设备支持多点触控,那么同一时间可以传递多个事件,我们把这些事件成为pointers
        final int oldPointerIdBits = event.getPointerIdBits();
        final int newPointerIdBits = oldPointerIdBits & desiredPointerIdBits;

        // If for some reason we ended up in an inconsistent state where it looks like we
        // might produce a motion event with no pointers in it, then drop the event.
        if (newPointerIdBits == 0) {
            return false;
        }

        // If the number of pointers is the same and we don't need to perform any fancy
        // irreversible transformations, then we can reuse the motion event for this
        // dispatch as long as we are careful to revert any changes we make.
        // Otherwise we need to make a copy.
        final MotionEvent transformedEvent;
        // 当事件传递过程中pointers数量保持不变时,我们可以以一个相对安全的方式将事件传递下去
        if (newPointerIdBits == oldPointerIdBits) {
            if (child == null || child.hasIdentityMatrix()) {
                // 判断方式同上
                if (child == null) {
                    handled = super.dispatchTouchEvent(event);
                } else {
                    // 同时可以将一些偏移量参数传入event中,这也是为什么ContextMenu可以获取到点击事件的位置的原因
                    final float offsetX = mScrollX - child.mLeft;
                    final float offsetY = mScrollY - child.mTop;
                    event.offsetLocation(offsetX, offsetY);

                    handled = child.dispatchTouchEvent(event);

                    event.offsetLocation(-offsetX, -offsetY);
                }
                return handled;
            }
            transformedEvent = MotionEvent.obtain(event);
        } else {
            // split方法主要是根据pointers数量变化决定event的类型,具体代码可以在MotionEvent.java中找到
            transformedEvent = event.split(newPointerIdBits);
        }

        // Perform any necessary transformations and dispatch.
        // 同理需要将transformedEvent传出去
        if (child == null) {
            handled = super.dispatchTouchEvent(transformedEvent);
        } else {
            final float offsetX = mScrollX - child.mLeft;
            final float offsetY = mScrollY - child.mTop;
            transformedEvent.offsetLocation(offsetX, offsetY);
            if (! child.hasIdentityMatrix()) {
                transformedEvent.transform(child.getInverseMatrix());
            }

            handled = child.dispatchTouchEvent(transformedEvent);
        }

        // Done.
        transformedEvent.recycle();
        return handled;
    }
再看一下dispatchTransformedTouchEvent被调用的位置
// ViewGroup.java 这是ViewGroup的dispatchTouchEvent方法,很明显了,应该功能类似View的dispatchTouchEvent
// 都是对MotionEvent进行传递,这里代码很长,仅仅保留最重要的部分
    @Override
    public boolean dispatchTouchEvent(MotionEvent ev) {
        // ...
        boolean handled = false;
        if (onFilterTouchEventForSecurity(ev)) {
            final int action = ev.getAction();
            final int actionMasked = action & MotionEvent.ACTION_MASK;

            // Handle an initial down.
            if (actionMasked == MotionEvent.ACTION_DOWN) {
                // Throw away all previous state when starting a new touch gesture.
                // The framework may have dropped the up or cancel event for the previous gesture
                // due to an app switch, ANR, or some other state change.
                cancelAndClearTouchTargets(ev);
                resetTouchState();
            }

            // Check for interception.
            // 这里多了一个参数intercepted,很重要,用于截断事件的传递
            final boolean intercepted;
            if (actionMasked == MotionEvent.ACTION_DOWN
                    || mFirstTouchTarget != null) {
                final boolean disallowIntercept = (mGroupFlags & FLAG_DISALLOW_INTERCEPT) != 0;
                if (!disallowIntercept) {
                    // intercepted的值通过onInterceptTouchEvent方法得到,重写此方法可以截断事件的传递
                    intercepted = onInterceptTouchEvent(ev);
                    ev.setAction(action); // restore action in case it was changed
                } else {
                    intercepted = false;
                }
            } else {
                // There are no touch targets and this action is not an initial down
                // so this view group continues to intercept touches.
                intercepted = true;
            }
            // ...

            // 如果intercepted为true,则事件不会被传递下去,如果为false,则会将事件传递下去
            if (!canceled && !intercepted) {

                // If the event is targeting accessibility focus we give it to the
                // view that has accessibility focus and if it does not handle it
                // we clear the flag and dispatch the event to all children as usual.
                // We are looking up the accessibility focused host to avoid keeping
                // state since these events are very rare.
                // 循环遍历ViewGroup的所有子view,将事件传递下去
                View childWithAccessibilityFocus = ev.isTargetAccessibilityFocus()
                        ? findChildWithAccessibilityFocus() : null;

                if (actionMasked == MotionEvent.ACTION_DOWN
                        || (split && actionMasked == MotionEvent.ACTION_POINTER_DOWN)
                        || actionMasked == MotionEvent.ACTION_HOVER_MOVE) {
                    final int actionIndex = ev.getActionIndex(); // always 0 for down
                    final int idBitsToAssign = split ? 1 << ev.getPointerId(actionIndex)
                            : TouchTarget.ALL_POINTER_IDS;

                    // Clean up earlier touch targets for this pointer id in case they
                    // have become out of sync.
                    removePointersFromTouchTargets(idBitsToAssign);

                    final int childrenCount = mChildrenCount;
                    if (newTouchTarget == null && childrenCount != 0) {
                        final float x = ev.getX(actionIndex);
                        final float y = ev.getY(actionIndex);
                        // Find a child that can receive the event.
                        // Scan children from front to back.
                        final ArrayList<View> preorderedList = buildTouchDispatchChildList();
                        final boolean customOrder = preorderedList == null
                                && isChildrenDrawingOrderEnabled();
                        final View[] children = mChildren;
                        // 循环开始的位置
                        for (int i = childrenCount - 1; i >= 0; i--) {
                            final int childIndex = getAndVerifyPreorderedIndex(
                                    childrenCount, i, customOrder);
                            final View child = getAndVerifyPreorderedView(
                                    preorderedList, children, childIndex);

                            // If there is a view that has accessibility focus we want it
                            // to get the event first and if not handled we will perform a
                            // normal dispatch. We may do a double iteration but this is
                            // safer given the timeframe.
                            if (childWithAccessibilityFocus != null) {
                                if (childWithAccessibilityFocus != child) {
                                    continue;
                                }
                                childWithAccessibilityFocus = null;
                                i = childrenCount - 1;
                            }

                            if (!canViewReceivePointerEvents(child)
                                    || !isTransformedTouchPointInView(x, y, child, null)) {
                                ev.setTargetAccessibilityFocus(false);
                                continue;
                            }

                            newTouchTarget = getTouchTarget(child);
                            if (newTouchTarget != null) {
                                // Child is already receiving touch within its bounds.
                                // Give it the new pointer in addition to the ones it is handling.
                                newTouchTarget.pointerIdBits |= idBitsToAssign;
                                break;
                            }

                            resetCancelNextUpFlag(child);
                            // 调用dispatchTransformedTouchEvent的位置
                            if (dispatchTransformedTouchEvent(ev, false, child, idBitsToAssign)) {
                                // Child wants to receive touch within its bounds.
                                mLastTouchDownTime = ev.getDownTime();
                                if (preorderedList != null) {
                                    // childIndex points into presorted list, find original index
                                    for (int j = 0; j < childrenCount; j++) {
                                        if (children[childIndex] == mChildren[j]) {
                                            mLastTouchDownIndex = j;
                                            break;
                                        }
                                    }
                                } else {
                                    mLastTouchDownIndex = childIndex;
                                }
                                mLastTouchDownX = ev.getX();
                                mLastTouchDownY = ev.getY();
                                newTouchTarget = addTouchTarget(child, idBitsToAssign);
                                alreadyDispatchedToNewTouchTarget = true;
                                break;
                            }

                            // The accessibility focus didn't handle the event, so clear
                            // the flag and do a normal dispatch to all children.
                            ev.setTargetAccessibilityFocus(false);
                        }
                        if (preorderedList != null) preorderedList.clear();
                    }

                    if (newTouchTarget == null && mFirstTouchTarget != null) {
                        // Did not find a child to receive the event.
                        // Assign the pointer to the least recently added target.
                        newTouchTarget = mFirstTouchTarget;
                        while (newTouchTarget.next != null) {
                            newTouchTarget = newTouchTarget.next;
                        }
                        newTouchTarget.pointerIdBits |= idBitsToAssign;
                    }
                }
            }
            // 如果intercepted为true,则在这里调用dispatchTransformedTouchEvent
            // 调用dispatchTransformedTouchEvent即调用本身的onTouchEvent方法
            // 只看核心代码就可以知道事件传递的规则
            // Dispatch to touch targets.
            if (mFirstTouchTarget == null) {
                // No touch targets so treat this as an ordinary view.
                handled = dispatchTransformedTouchEvent(ev, canceled, null,
                        TouchTarget.ALL_POINTER_IDS);
            } else {
                // Dispatch to touch targets, excluding the new touch target if we already
                // dispatched to it.  Cancel touch targets if necessary.
                TouchTarget predecessor = null;
                TouchTarget target = mFirstTouchTarget;
                while (target != null) {
                    final TouchTarget next = target.next;
                    if (alreadyDispatchedToNewTouchTarget && target == newTouchTarget) {
                        handled = true;
                    } else {
                        final boolean cancelChild = resetCancelNextUpFlag(target.child)
                                || intercepted;
                        if (dispatchTransformedTouchEvent(ev, cancelChild,
                                target.child, target.pointerIdBits)) {
                            handled = true;
                        }
                        if (cancelChild) {
                            if (predecessor == null) {
                                mFirstTouchTarget = next;
                            } else {
                                predecessor.next = next;
                            }
                            target.recycle();
                            target = next;
                            continue;
                        }
                    }
                    predecessor = target;
                    target = next;
                }
            }

            // Update list of touch targets for pointer up or cancel, if needed.
            if (canceled
                    || actionMasked == MotionEvent.ACTION_UP
                    || actionMasked == MotionEvent.ACTION_HOVER_MOVE) {
                resetTouchState();
            } else if (split && actionMasked == MotionEvent.ACTION_POINTER_UP) {
                final int actionIndex = ev.getActionIndex();
                final int idBitsToRemove = 1 << ev.getPointerId(actionIndex);
                removePointersFromTouchTargets(idBitsToRemove);
            }
        }

        if (!handled && mInputEventConsistencyVerifier != null) {
            mInputEventConsistencyVerifier.onUnhandledEvent(ev, 1);
        }
        return handled;
    }
继续往上看,我们就能发现ViewGroup的dispatchTouchEvent方法由DecorView的superDispatchTouchEvent调用,而DecorView又是由PhoneWindow或者Window的superDispatchTouchEvent调用,PhoneWindow的superDispatchTouchEvent方法又是由activity的dispatchTouchEvent方法调用,具体代码如下
// Activity.java
    /**
     * Called to process touch screen events.  You can override this to
     * intercept all touch screen events before they are dispatched to the
     * window.  Be sure to call this implementation for touch screen events
     * that should be handled normally.
     *
     * @param ev The touch screen event.
     *
     * @return boolean Return true if this event was consumed.
     */
    public boolean dispatchTouchEvent(MotionEvent ev) {
        if (ev.getAction() == MotionEvent.ACTION_DOWN) {
            onUserInteraction();
        }
        // 核心代码getWindow().superDispatchTouchEvent(ev)
        if (getWindow().superDispatchTouchEvent(ev)) {
            return true;
        }
        return onTouchEvent(ev);
    }

// -----------------------------------------------------------------------

// Window.java
    /**
     * Used by custom windows, such as Dialog, to pass the touch screen event
     * further down the view hierarchy. Application developers should
     * not need to implement or call this.
     *
     */
    // 抽象方法,具体由PhoneWindow实现
    public abstract boolean superDispatchTouchEvent(MotionEvent event);

// -----------------------------------------------------------------------

// DecorView.java
    // PhoneWindow的superDispatchTouchEvent方法交由DecorView实现,DecorView继承自ViewGroup,最终调用的还是ViewGroup的dispatchTouchEvent方法
    public boolean superDispatchTouchEvent(MotionEvent event) {
        return super.dispatchTouchEvent(event);
    }
结合前半部分自底向上和后半部分自顶向下的分析,我们知道了dispatchTouchEvent传递事件的流程:
从activity -> PhoneWindow/DecorView -> ViewGroup(如果布局中有的话) -> View
- dispatchTouchEvent是一种层层递归式的调用,只有在递归到View中被执行时才会返回,一般来说返回true代表事件被消耗了,而事件的处理在OnTouchEvent中;
- ViewGroup中有onInterceptTouchEvent方法可以中断事件的传递,重写此方法让它返回true,那么事件不会传递到子view中,onInterceptTouchEvent默认返回false;
- 在OnTouchEvent中返回true,则父容器不会执行OnTouchEvent方法,在OnTouchEvent中返回false,则父容器会执行OnTouchEvent方法,且后续的所有事件都会在父容器中处理,不再向下传递。
举两个例子说明如何通过onInterceptTouchEvent方法中断事件的传递
第一个例子,一个LinearLayout中包含一个Button,LinearLayout和Button都设置onClick方法,很显然当我们点击Button时Button的onClick方法执行,当我们点击LinearLayout时LinearLayout的onClick方法执行;如果设置了log打印diapatchTouchEvent方法的执行顺序,那么可以发现:
点击Button: activity dispatchTouchEvent -> linearlayout dispatchTouchEvent -> button dispatchTouchEvent
点击LinearLayout: activity dispatchTouchEvent -> linearlayout dispatchTouchEvent
如果我们希望LinearLayout拦截传给Button的事件,那么就需要用到onInterceptTouchEvent方法
直接在自定义LinearLayout中重写onInterceptTouchEvent方法,让它返回true,则该LinearLayout下的所有子view都无法接收到事件
    @Override
    public boolean onInterceptTouchEvent(MotionEvent ev) {
        return true;
    }
第二个例子,禁止ViewPager左右滑动,首先需要明白一个问题,为什么ViewPager可以使页面左右滑动,如果ViewPager中的Fragment中也包含一个控件CustomTextView,那么滑动会产生冲突吗?
首先看一下log日志,这是在自定义的CustomViewPager和CustomTextView中与TouchEvent相关的代码执行顺序
CustomViewPager:    dispatchTouchEvent    - ACTION_DOWN
CustomViewPager:    onInterceptTouchEvent - ACTION_DOWN
CustomTextView:     dispatchTouchEvent    - ACTION_DOWN
CustomTextView:     onTouchEvent          - ACTION_DOWN
CustomViewPager:    onTouchEvent          - ACTION_DOWN
CustomViewPager:    dispatchTouchEvent    - ACTION_MOVE
CustomViewPager:    onTouchEvent          - ACTION_MOVE
CustomViewPager:    dispatchTouchEvent    - ACTION_UP
CustomViewPager:    onTouchEvent          - ACTION_UP
下面是两个自定义的代码
public class CustomViewPager extends ViewPager {
    private static final String TAG = "aaaa-CustomViewPager";

    private boolean enabled;

    public CustomViewPager(@NonNull Context context) {
        super(context);
        this.enabled = true;
    }

    public CustomViewPager(Context context, AttributeSet attrs) {
        super(context, attrs);
        this.enabled = true;
    }

    @Override
    public boolean dispatchTouchEvent(MotionEvent ev) {
        Log.i(TAG, "dispatchTouchEvent - " + " - " + ev.toString());
        return super.dispatchTouchEvent(ev);
    }

    @Override
    public boolean onTouchEvent(MotionEvent event) {
        if (this.enabled) {
            Log.i(TAG, "onTouchEvent - " + " - " + event.toString());
            return super.onTouchEvent(event);
        }
        return false;
    }
// 根据后面的分析可知,对于ACTION_DOWN事件来说,super.onInterceptTouchEvent(event)默认返回false
// 这段代码看似都是返回false,对结果没有影响,但是实际上将onInterceptTouchEvent的调用从ViewGroup转到ViewPager中
    @Override
    public boolean onInterceptTouchEvent(MotionEvent event) {
        if (this.enabled) {
            Log.i(TAG, "onInterceptTouchEvent - " + " - " + event.toString());
            return super.onInterceptTouchEvent(event);
        }
        return false;
    }

    public void setPagingEnabled(boolean enabled) {
        this.enabled = enabled;
    }
}

public class CustomTextView extends AppCompatTextView {

    private static final String TAG = "aaaa-CustomTextView";

    public CustomTextView(Context context) {
        super(context);
    }

    public CustomTextView(Context context, AttributeSet attrs) {
        super(context, attrs);
    }

    public CustomTextView(Context context, AttributeSet attrs, int defStyleAttr) {
        super(context, attrs, defStyleAttr);
    }

    @Override
    public boolean dispatchTouchEvent(MotionEvent event) {
        Log.i(TAG, "dispatchTouchEvent - " + " - " + event.toString());
        return super.dispatchTouchEvent(event);
    }

    @Override
    public boolean onTouchEvent(MotionEvent event) {
        Log.i(TAG, "onTouchEvent - " + " - " + event.toString());
        return super.onTouchEvent(event);
    }
}
对于ACTION_DOWN事件来说,事件传递流程为:
- CustomViewPager的dispatchTouchEvent(应该是来自于PhoneWindow/DecorView),调用
super.dispatchTouchEvent(ev),即ViewGroup的dispatchTouchEvent方法; - 在上面ViewGroup的源码中我们知道,ViewGroup的dispatchTouchEvent方法中调用了onInterceptTouchEvent方法
intercepted = onInterceptTouchEvent(ev);,由于我们在CustomViewPager中重写了onInterceptTouchEvent方法,所以会回到CustomViewPager的onInterceptTouchEvent方法; - 默认情况下this.enabled为true,所以我们开始调用
super.onInterceptTouchEvent(event),此时super是ViewPager的onInterceptTouchEvent方法; - 再看ViewPager的源码,对于ACTION_DOWN事件来说,onInterceptTouchEvent返回false,所以CustomViewPager的onInterceptTouchEvent方法直接返回false,又回到ViewGroup的dispatchTouchEvent方法中;
- 当
intercepted = onInterceptTouchEvent(ev);中intercepted为false时,会执行子view的dispatchTouchEvent方法,子view即CustomTextView的dispatchTouchEvent方法; - CustomTextView的dispatchTouchEvent方法默认调用
super.dispatchTouchEvent(event),即View的dispatchTouchEvent方法,而从View的源码中可知其调用onTouchEvent方法,而我们的CustomTextView重写了onTouchEvent方法,但是此方法又返回到TextView的onTouchEvent方法中,最终还是回到View的onTouchEvent方法,对于ACTION_DOWN事件来说,最终CustomTextView的onTouchEvent方法返回false,则CustomTextView的super以及CustomTextView的dispatchTouchEvent方法返回false,对应5中,如果子view的dispatchTouchEvent方法返回false,则第5步中ViewGroup会执行super.dispatchTouchEvent(event),即ViewGroup的父类View的dispatchTouchEvent方法,此处的View不再是子view,而是作为CustomViewPager,因为CustomViewPager重写了onTouchEvent方法,所以View的dispatchTouchEvent方法中调用的onTouchEvent方法为CustomViewPager的onTouchEvent方法,而CustomViewPager的onTouchEvent方法调用super.onTouchEvent(event),即ViewPager的onTouchEvent方法; - ViewPager的onTouchEvent方法即最终实现滑动效果的地方,根据代码可知,只有在没有adapter或者滑动到最边缘的页面才会返回false,其他情况返回true;
- ViewPager的onTouchEvent方法返回true即处理了ACTION_DOWN事件,那么依次CustomViewPager的onTouchEvent方法返回true,CustomViewPager的dispatchTouchEvent方法返回true,至此ACTION_DOWN事件的处理结束了。
对于ACTION_MOVE和ACTION_UP事件来说(这两个事件分发流程基本相同),事件传递流程为:
- CustomViewPager的dispatchTouchEvent(应该是来自于PhoneWindow/DecorView),调用
super.dispatchTouchEvent(ev),即ViewGroup的dispatchTouchEvent方法; - ViewGroup的dispatchTouchEvent方法中intercepted为true,拦截了ACTION_MOVE事件,由自身处理,即调用CustomViewPager的onTouchEvent方法;
- CustomViewPager的onTouchEvent方法调用
super.onTouchEvent(event),即ViewPager的onTouchEvent方法,在这里实现滑动的效果,根据代码可知,只有在没有adapter或者滑动到最边缘的页面才会返回false,其他情况返回true; - 然后依次CustomViewPager的onTouchEvent返回true,CustomViewPager的dispatchTouchEvent方法返回true。
简而言之,事件分发就是一系列的dispatchTouchEvent、onInterceptTouchEvent和onTouchEvent方法的相互调用,首先需要明确地就是最终实现滑动效果、点击效果的都是各个控件的onTouchEvent方法,dispatchTouchEvent仅用作事件分发的开始,而onInterceptTouchEvent方法用于终止事件向子控件传递。
以上面的代码为例可以得到一些结论:
- ViewPager的onInterceptTouchEvent一般对ACTION_DOWN事件返回false,即不会对ACTION_DOWN进行拦截,那么ACTION_DOWN必定传到子view中;
- 如果ViewPager的子view无法在onTouchEvent中进行处理,比如这里的CustomTextView,对于ACTION_DOWN事件,CustomTextView的onTouchEvent返回false(为什么无法处理ACTION_DOWN,从源码中可知是由于CustomTextView的clickable为false,所以返回false),所以CustomTextView的dispatchTouchEvent方法返回false,相当于告诉父view不要再传给我ACTION_DOWN了,我没法处理;
- 如果ViewPager的子view的dispatchTouchEvent方法返回false,那么ViewPager就会调用自己的onTouchEvent来处理,ViewPager的onTouchEvent可以处理ACTION_DOWN事件,并记录了点击的位置,然后返回true,从而ViewPager的dispatchTouchEvent方法返回true,ACTION_DOWN事件结束;
- 紧接着ACTION_DOWN事件的必定是ACTION_MOVE或ACTION_UP,以ACTION_MOVE为例,同样是从ViewPager的dispatchTouchEvent方法开始,此时没有调用onInterceptTouchEvent方法,而是直接执行onTouchEvent方法,即根据ACTION_MOVE事件带的参数实现滑动效果,然后返回true;
- 紧接着ACTION_MOVE的必然是ACTION_UP,流程同4;
- 当ViewGroup的onTouchEvent方法可以处理ACTION_DOWN事件时,即onTouchEvent方法返回true,则此ViewGroup的onInterceptTouchEvent方法不再执行(对的,就算不执行也可以拦截事件),同时后续事件被拦截,经由此ViewGroup的onTouchEvent处理。
综上所述,如果ViewPager的子view无法处理ACTION_DOWN事件,那么ViewPager自己就会处理ACTION_DOWN事件,并在后续事件传递过程中拦截(不是通过onInterceptTouchEvent方法),后续的ACTION_MOVE或ACTION_UP由ViewPager进行处理,在ViewPager的onTouchEvent中实现了滑动的效果。
如果我们在ViewPager中加上HorizontalScrollView,并加上几个CustomTextView,会产生怎样的效果呢
<?xml version="1.0" encoding="utf-8"?>
<LinearLayout xmlns:android="http://schemas.android.com/apk/res/android"
    android:layout_width="match_parent"
    android:layout_height="match_parent"
    android:orientation="vertical">

    <us.zoom.videomeetings.viewpagerdemo.custom.CustomHorizontalScrollView
        android:layout_width="match_parent"
        android:layout_height="wrap_content">

        <us.zoom.videomeetings.viewpagerdemo.custom.CustomLinearLayout
            android:layout_width="match_parent"
            android:layout_height="wrap_content"
            android:orientation="horizontal">

            <us.zoom.videomeetings.viewpagerdemo.custom.CustomTextView
                android:id="@+id/custom_tv"
                android:layout_width="wrap_content"
                android:layout_height="wrap_content"
                android:layout_gravity="center"
                android:layout_margin="40dp"
                android:background="@color/colorPrimary"
                android:padding="40dp"
                android:text="Fragment"
                android:textSize="30sp" />

            <us.zoom.videomeetings.viewpagerdemo.custom.CustomTextView
                android:id="@+id/custom_tv2"
                android:layout_width="wrap_content"
                android:layout_height="wrap_content"
                android:layout_gravity="center"
                android:layout_margin="40dp"
                android:background="@color/colorPrimary"
                android:padding="40dp"
                android:text="Fragment"
                android:textSize="30sp" />

        </us.zoom.videomeetings.viewpagerdemo.custom.CustomLinearLayout>

    </us.zoom.videomeetings.viewpagerdemo.custom.CustomHorizontalScrollView>

</LinearLayout>
CustomHorizontalScrollView和CustomLinearLayout都是直接继承,仅重写dispatchTouchEvent、onTouchEvent、onInterceptTouchEvent方法,加上log,这里就不加代码了,基本同上。
在上述的演示效果中可以发现,如果滑动的位置是TextView,则ViewPager的左右滑动似乎被卡住了,但是偶尔可以切换,而且就算滑动到第二个TextView的边缘也不能切换fragment;如果滑动的位置是下方空白区域则ViewPager可以正常滑动。
根据log以及上文的分析可知,ViewPager左右滑动被卡住的原因是:
- ACTION_DOWN事件向下层层传递到CustomTextView,结果发现CustomTextView的onTouchEvent无法处理返回了false,然后向上层层传递直到CustomHorizontalScrollView发现自己可以处理ACTION_DOWN事件,于是其onTouchEvent返回了true,则CustomHorizontalScrollView的dispatchTouchEvent方法返回true,从而CustomViewPager的onTouchEvent无法执行;
- 紧接着ACTION_MOVE事件向下层层传递到CustomHorizontalScrollView,发现CustomHorizontalScrollView之前处理了ACTION_DOWN,那么后续所有事件都被CustomHorizontalScrollView拦截,通过其onTouchEvent处理,并返回true,则CustomHorizontalScrollView的dispatchTouchEvent方法返回true,从而CustomViewPager的onTouchEvent无法执行;
- ACTION_UP事件同2。
经过上面的分析知道了其实是CustomHorizontalScrollView能够处理所有事件,从而导致CustomViewPager无法执行onTouchEvent,因此ViewPager无法左右滑动。
因此我们可以简单完成几个对滑动控制的需求
4.1 禁用ViewPager的滑动,子view可以滑动
这个需求是为了解决上面提到的ViewPager偶尔可以滑动的问题,很显然这里可能是事件传递过程中触发了某种条件导致事件最终由ViewPager的onTouchEvent方法处理,我们要防止这种情况发生。解决的方法是CustomViewPager的onTouchEvent返回false(确保CustomViewPager不会处理滑动事件),同时可以在CustomViewPager的onInterceptTouchEvent返回false(可选,但是可以保证CustomViewPager不对事件进行拦截)。
4.2 ViewPager仅在子view滑动到左右边界时可以滑动
直接看代码
public class CustomHorizontalScrollView extends HorizontalScrollView {

    private static final String TAG = CustomHorizontalScrollView.class.getSimpleName();

    public CustomHorizontalScrollView(Context context) {
        super(context);
    }

    public CustomHorizontalScrollView(Context context, AttributeSet attrs) {
        super(context, attrs);
    }

    public CustomHorizontalScrollView(Context context, AttributeSet attrs, int defStyleAttr) {
        super(context, attrs, defStyleAttr);
    }

    public CustomHorizontalScrollView(Context context, AttributeSet attrs, int defStyleAttr, int defStyleRes) {
        super(context, attrs, defStyleAttr, defStyleRes);
    }

    /**
     * 可以在此处理冲突
     *
     * @param ev
     * @return
     */
    @Override
    public boolean dispatchTouchEvent(MotionEvent ev) {
        // 还没滑到右边,请求父控件不要拦截我的事件,事件自己处理 true ;已经滑到右边,则事件交由父控件处理 false。
        // getParent().requestDisallowInterceptTouchEvent(!isScrollToRight());
        return super.dispatchTouchEvent(ev);
    }

    /**
     * 也可以在此处理冲突
     *
     * @param ev
     * @return
     */
    @Override
    public boolean onTouchEvent(MotionEvent ev) {
        switch (ev.getAction()) {
            case MotionEvent.ACTION_DOWN:
                break;
            // 处理的逻辑是在ACTION_MOVE事件上,如果滑动到最左或最右边则调用
            // getParent().requestDisallowInterceptTouchEvent(false)
            // 那么HorizontalScrollView的父view会拦截掉ACTION_MOVE事件,
            // 即ViewPager拦截ACTION_MOVE事件,由他的onTouchEvent处理
            case MotionEvent.ACTION_MOVE:
                if (isScrollToLeft() || isScrollToRight()) {
                    Log.e(TAG, "滑到" + (isScrollToLeft() ? "左边" : "右边"));
                    // 把事件交给父控件处理,例如:viewpager滑动
                    getParent().requestDisallowInterceptTouchEvent(false);
                }
                break;

            case MotionEvent.ACTION_UP:
            case MotionEvent.ACTION_CANCEL:
                // 请求父控件可以拦截事件
                getParent().requestDisallowInterceptTouchEvent(false);
                break;

            default:
        }
        return super.onTouchEvent(ev);
    }

    @Override
    public boolean onInterceptTouchEvent(MotionEvent ev) {
        return super.onInterceptTouchEvent(ev);
    }

    /**
     * 是否已经滑到了最右边
     *
     * @return
     */
    private boolean isScrollToRight() {
        // getScrollX得到View的最左边的位置,若HorizontalScrollView滑到最右边,则为负值;
        // getScrollX() + getWidth()为最右边的位置
        // getChildAt(getChildCount() - 1).getRight()恰好得到子view的最右边的位置
        return getChildAt(getChildCount() - 1).getRight() == getScrollX() + getWidth();
    }

    /**
     * 是否已经滑到了最左边
     *
     * @return
     */
    private boolean isScrollToLeft() {
        return getScrollX() == 0;
    }
}
滑动冲突的解决方式有两种:
1.外部拦截法:触摸事件都先经过父容器的拦截处理,如果父容器需要此事件就拦截,不需要就不拦截(此方法符合view事件分发机制),这样就可以解决滑动冲突问题。需要重写onInterceptTouchEvent方法,伪代码如下:
@Override
    public boolean onInterceptTouchEvent(MotionEvent ev)
    {
        boolean intercept = false;
        switch (ev.getAction()) {
            case MotionEvent.ACTION_DOWN:
              // 不能拦截,否则无法传递事件给子元素
                intercept = false;
                break;

            case MotionEvent.ACTION_MOVE:
             // 针对不同的滑动冲突,只需要修改这个条件即可,其它均不需做修改并且也不能修改
                if (滑动事件交由父容器处理)
                {
                    // 拦截事件
                    intercept = true;
                }
                else
                {
                    // 不拦截事件
                    intercept = false;
                }
                break;

            case MotionEvent.ACTION_UP:
            case MotionEvent.ACTION_CANCEL:
                // 不拦截,否则子元素可能无法接收到这两个事件
                intercept = false;
                break;

            default:
        }
        return intercept;
    }
2.内部拦截法:父容器不拦截任何事件,所有的事件都传递给子元素,如果子元素需要此事件就直接消耗掉,否则就交由父容器进行处理,这种方法和android中的事件分发机制不一致,需要配合
requestDisallowInterceptTouchEvent方法才能正常工作,使用越来较外部拦截法稍显复杂。我们可以修改dispatchTouchEvent方法或者onTouchEvent方法来达到目的。伪代码如下:
@Override
    public boolean dispatchTouchEvent(MotionEvent ev) {
        switch (ev.getAction()) {
            case MotionEvent.ACTION_DOWN:
                getParent().requestDisallowInterceptTouchEvent(true);
                break;

            case MotionEvent.ACTION_MOVE:
            // 针对不同的滑动冲突,只需要修改这个条件即可,其它均不需做修改并且也不能修改
                if (父容器需要此类触摸事件)
                {
                    getParent().requestDisallowInterceptTouchEvent(false);
                }
                break;

            case MotionEvent.ACTION_UP:
            case MotionEvent.ACTION_CANCEL:
                break;

            default:
        }
        return super.dispatchTouchEvent(ev);
    }